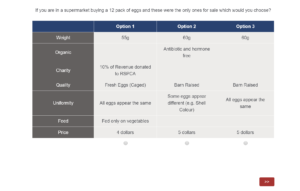
An example question appears below.
Creating the choice experiment
We can create a choice experiment in Displayr by selecting Insert > More > Conjoint/Choice Modeling > Experimental Design from the Ribbon. In Q, you select Automate > Browse Online Library > Conjoint/Choice Modeling > Experimental Design. It’s typically impossible to ask all combinations of attributes and alternatives in a questionnaire. As a result, it’s important that the subset of possible questions that we do ask is selected in a way that maximizes the amount of information we collect from the sample of respondents.
A number of different algorithms and features can be implemented depending on the type of experiment we want to do. These include partial profiles designs, alternative-specific attributes, and prohibitions. Currently six algorithms are implemented, with an additional two handling alternative specific designs.
Partial profiles designs are used for experiments with many alternatives, in order to reduce respondent fatigue. For each question, some attributes are fixed at a particular level across alternatives and not shown to the respondent. Thus, the respondent does not have to consider so many attributes when deciding between alternatives. Displayr supports these types of designs by adding custom JavaScript to each question in the Qualtrics survey. This means that the constant attributes are hidden in each question.
Getting account details from Qualtrics
In order to export your design to Qualtrics, you’ll need to get some information from your Qualtrics account. The most important piece is your API token. This is your unique (private) key that allows you to upload to and download from your Qualtrics account via the Qualtrics API. You should also grab your Organization ID and Datacenter ID from the same spot.
You can access this information by logging into Qualtrics, clicking the person icon in the top right, and selecting Account Settings. From there, select Qualtrics ID. Your token will be listed under API; see the image below.
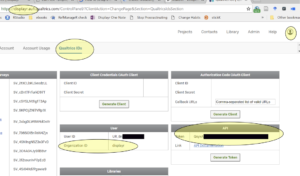
Note also the Organization ID under User. Finally, we can determine our Datacenter ID by looking at the URL in the browser: the first part of the URL after the protocol is our Organization ID followed by our Datacenter ID. In the screenshot above, the Datacenter ID is “au1”.
Exporting the experiment to Qualtrics
With the design generated in Displayr/Q and our account info obtained from Qualtrics, we are now ready to generate and export the Qualtrics survey. In Displayr, this is accomplished by going to Insert > More > Conjoint/Choice Modeling > Export Design To Qualtrics. In Q, you can use this feature by going to Automate > Browse Online Library > Conjoint/Choice Modeling > Export Design To Qualtrics. Below I discuss the various inputs you use to export and customize your survey.
- “Choice experimental design output” – Use this dropdown to select the experimental design we generated in the first step above.
- “Qualtrics API key”, “Qualtrics data center ID”, “Qualtrics organization ID” – Here we input the values we obtained from our Qualtrics account in the second step above.
- “Name to use for questionnaire” – What we want the survey to be called in Qualtrics.
- “URL for existing QSF file” – We can use this if we want our choice questions to be added to an existing Qualtrics survey. Discussed in detail below.
- “Choice question text” – Here we enter the text specifying the question asked for each choice question.
- “Dual response none” – Check this box if you’d like to include a dual-response none question after each choice question in your questionnaire. A dual-response none question is typically used to ask a respondent if they really would select the choice they just specified. Use “None question text” to enter the wording of the dual-response none question to be asked.
- “Alternative labels” – The labels to be used for the alternatives, not including the “None” alternatives. Separate each alternative with a comma.
- “None labels”, “None text” – If the experiment you generated contains none alternatives, use these inputs to customize what text is used to label the none alternatives and what text appears below the labels. If you have multiple none alternatives, separate the different alternatives with a comma. It’s important to note that the none alternatives come from the design we generated and are independent of the dual-response none question.
- The text boxes “Custom style for alternative labels”, “Custom style for attribute labels”, and “Custom style for attribute names” are optional and provided so that you can style various parts of the choice question using CSS. Note also that you are not just limited to plain text for the other text inputs such as “Choice question text”, “Alternative labels”, or the attribute levels (specified when creating the experiment in the first step); you can write html for custom formatting.
- “Forced responses” – If this option is checked, the choice questions must be answered before the respondent can proceed to the next question in the questionnaire.
- “Don’t show constant attributes” – If you’re using a partial profiles design, you’ll want to check this box to hide the attributes that aren’t varying among the alternatives when they are displayed to the respondent.
- “Progress bar” – Select this option if you’d like respondents to see a progress bar at the top of the screen when they’re completing the questionnaire.
The complete documentation can be viewed on the wiki.
Adding the choice experiment to an existing survey
If you want your questionnaire to have screening questions, post survey questions, or use some other Qualtrics features, you can create a survey with these features in Qualtrics and then use it as an input via the “URL for existing QSF file” textbox. The questions from the discrete choice experiment will be inserted in the first empty block in the provided survey.
To get the QSF file you wish to use, when viewing the survey in Qualtrics, select Tools > Import/Export > Export survey to save the QSF file to your computer. You will then need to upload the file to a web service such as Dropbox to obtain a URL that you can provide to the “URL for existing QSF file” textbox. When using a Dropbox link, the link should end in “?dl=1” so it will download automatically into the Export to Qualtrics tool.
You can also use this process to put multiple Displayr/Q-generated choice experiments into the same Qualtrics survey.
1) Use Export Design To Qualtrics in Displayr or Q to create a survey with the first choice experiment.
2) Export the generated survey from Qualtrics.
3) Use Export Design To Qualtrics again with the exported QSF file from 2) and the second choice experiment.
Viewing and Editing the Survey
After the survey is uploaded, there may be a slight delay before the generated survey appears in your Qualtrics control panel. However, the survey can be viewed immediately using the survey ID or URL contained in the output.
When you view the survey in Qualtrics, you will notice that questions contain values such as ${e://Field/q.text} and ${e://Field/attr1.1.1}. This is the notation Qualtrics uses for its embedded data. You can view the actual values that will be displayed by previewing the questionnaire or editing the Survey Flow in Qualtrics. Embedded data is used here to handle experiments with multiple versions and to make it easy to edit the survey. If you need to make changes (e.g., to the wording of the choice questions), you can by simply clicking on Survey Flow and editing the corresponding embedded data value.
Currently, there is a limit on the file size that Qualtrics allows to be uploaded via its API. This means that experiments with hundreds of versions and many attributes and alternatives may be rejected when an attempt is made to export them to Qualtrics. However, it is still possible to upload the QSF survey file from within your Qualtrics account. Contact me or Displayr/Q support if you encounter this or any other issues.
Get in touch if you have any questions, and see our blog to keep up on all the latest Q and Displayr features.