


Sometimes the geographic map visualization is not initially centered or zoomed into the preferred level. This article will show you how to customize the initial position and zoom of your map using the leaflet map package.
Create a geographic map to your liking using the leaflet map package in Displayr
- Follow instructions on How to Make a Geographic Map in Displayr to create a map and hook up your data to the map. The example I will walk through maps the percentage of food inspections that passed in each Chicago zip code between 2010 and June 2018 (original data found here).
- Select a few more settings to make the map look nice. For my map I am also selecting the following in the Object Inspector:
- Use the leaflet map package using Chart > APPEARANCE > Map package > leaflet.
- Only show “Pass” rates by setting Inputs > COLUMN MANIPULATIONS > Number of columns from left to show as 1.
- Show background map for context by checking Chart > APPEARANCE > Background map.
- Set the color of missing regions to transparent by selecting Chart > APPEARANCE > Color of NA values > More colors > white box with the red X.
- Set the shading so that darker reds mean a lower pass rate using Chart > DATA SERIES > Color palette > Reds, dark to light.
The map below is created using the steps above.
You can’t see any of the data for Chicago in the map initially. To help the viewer see where the data is, we will zoom the map into Chicago automatically for them.
How to customize the default area shown on the geographic map
You’ll need four bits of information before we get started:
| For the code | Description | Value in example |
| YourVisualizationName | The Name of your map in Dispayr. You can find this by going to Properties > GENERAL > Name | chart.5 |
| TheLongitude | The longitude for the center of the map | -87.6298 |
| TheLatitude | The latitude for the center of the map | 41.8781 |
| TheZoomLevel | The zoom level from 0 (the world) to 18 (street-level) | 9 |
We will use this information in our R code to customize the initial appearance of the map.
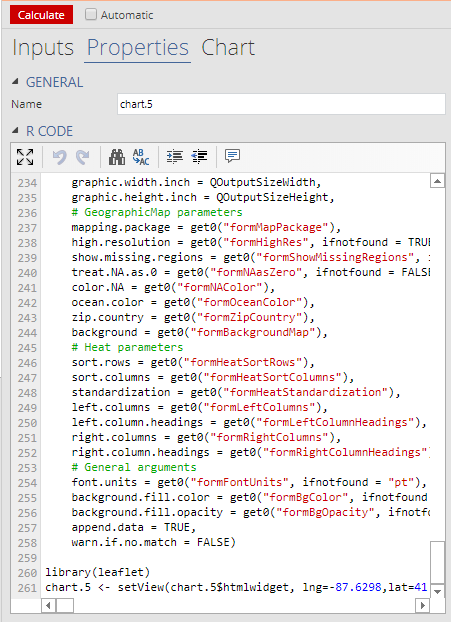
- Access the R code underlying the map Properties> R CODE
- At the bottom of the R code, load in the leaflet R package with library(leaflet) to get access to the full set of functions to customized the leaflet map.
- Add another line after that, to set the initial position and zoom of the map using the setView function from the leaflet R package. The syntax is as follows: YourVisualizationName <- setView(map = YourVisualizationName$htmlwidget, lng = TheLongitude, lat = TheLatitude, zoom = TheZoomLevel). For this example, this will be:
library(leaflet)
chart.5 <- setView(chart.5$htmlwidget, lng = -87.6298, lat = 41.8781, zoom = 9)

After your map recalculates, it will now automatically be zoomed into your desired area. The final map from my example is shown below.
Tips for positioning the initial map
- You can tweak your initial zoom level by using decimals, such as 1.5.
- To find the latitude and longitude to center your map you can:
- Click on a blank spot on a Google map. A small window at the bottom of the screen will display the coordinates.
- Google “YourCity/State/Country lat long“, and use coordinates from the results.
- Use a website such as https://www.latlong.net/ to find the coordinates.
Try creating one yourself with our interactive Geographic Maps tutorial
Check it out here